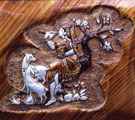
Saturday, May 23, 2009

Metal Embossing


Metal embossing

Metal embossing is not only a craft but an art also. You can make designs on an aluminum sheet and can add expressions too. You have to do your work neatly and with patience. You can decorate your house with your own paintings.

Tips to make metal embossing

1. You need a thin aluminum sheet for making the embossing. Cut the sheet as per the size of your picture.
2. Keep carbon paper over the aluminum sheet and place the design over it properly.
3. Place your aluminum sheet over a blanket to avoid cracks while drawing.
4. Now you have to draw the picture with a ball pen. Apply enough force while drawing so that the impression comes clearly on the aluminum sheet.
5. After making the impression of your design on the sheet you have to put dots on the sheets around the picture. This has to be done with a ball pen with enough stress.
6. Place the sheet with the reverse side up. Now you have to emboss the design over the sheet by pressing hard on the sheets with the embossing tools. Embossing tools are available in different shapes and thickness to give different levels of embossing. Leave the outlines of your design while pressing.
7. Turn the sheet over after finishing the embossing. You can see projections on the right side. Your picture is now embossed on the sheets.
8. You can paint your design with anti rust liquid. It is available in golden, dark brown and in brown color. Take the anti rust in cotton and apply it on the picture. You can use different shades to the back ground and to the picture. You can also leave some portions with out any paint. For example while making a lady you can leave the skin as such with out any color. Give darker colors to the ornaments and hair. Use different shades for her dress. You can use kerosene or turpentine to get lighter shades.
9. Shade the back ground with a lighter color so that the picture will have a striking effect.
10. Keep the picture for drying in a neat place to avoid the settling of dust over it.

You can frame your design on the next day and can decorate your home.

Thursday, May 21, 2009


Candle making

Candle making is very easy but at the same time it’s very innovative too. You can make your own candle by sitting at your home and can decorate them with colors, beads, flowers, potpuri and even leaves. You can produce effects on the candles with ice, or by whisking the wax, or by adding chunks of waxes. All the materials needed for making candles are now available in the market.

Tips to make the Candles

1. Manage to get a rigid or flexible mould for making wax. You can also use egg shells, small pots, cake moulds etc. for the purpose.
2. A wick and a wicking needle are essential. Place the wick in a hole given in the rigid mould. In flexible mould you have to make holes according to your needs. Leave half an inch of the wick above the mould and seal it with seal.
3. Priming is another method of placing the wick in the mould. Take boiling wax and dip the wick three or four times in it at regular intervals. This will make the wick stiff and it will stand straight.
4. You can also hand the wick in the mould by knotting the wick from a tooth pick.
5. Keep the mould in a proper place with out any tilt. If the mould does not have a flat base then keep it inside a flat based container. It must be vertical.
6. Take the wax in a bowl and place it over a container having water. Let the water boil and then keep it in a low flame till the entire wax melts. Use bee wax or paraffin wax for this purpose. It will be available as flakes, cylinders, sheets or blocks.
7. You can use readymade wax dyes for coloring the wax. Instead of this you can also use crayons or poster colors.
8. Stearic acid or a 10% stearin is found to be good with paraffin wax. It will control the burning rate of the paraffin wax and also helps the wax to harden again.
9. Now pour the completely melted wax in to the mould by keeping the wick in position.
10. You can place beads, petals, leaves etc on the sides of the mould. You can also decorate your candle center and top.
11. Allow the wax to cool overnight so that it becomes hard.
12. Remove the candle from the mould by inverting the mould and tapping it gently. If it is a flexible mould then peel it carefully from the top.


Your candle is now ready to use.